Tag Archive for Checklist

NCT Checklist

NCT

While the reasoning behind the NCT is sound, it’s fair to say that nobody sees it that way when it’s their vehicles turn be put to the test.

But all cars must eventually go through it. And with figures indicating a + 50% failure rate year on year, and over 3,000 cars towed from centres so far in 2015 having been deemed un-roadworthy, the NCT appears to be doing its job.

Those figures are certainly daunting for anyone preparing to have their car put through its paces. And there are certain fixes that will be beyond most people (such as the number one fault Front Suspension). But there are certain easy-to-follow-steps that will give your car a better chance of passing and that won’t require a pre NCT-Check to identify.


Checks:

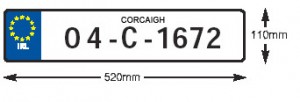
Registration Plate / Lights: Number Plates can fail for a number of reasons. If one or both are missing, insecure or not clearly visible, or if numbers or letters are missing or unreadable and an incorrect size / colour. Clearly visible marks can also be a cause for failure. Check that the lights are working properly, and are white in colour.

imgres plate1


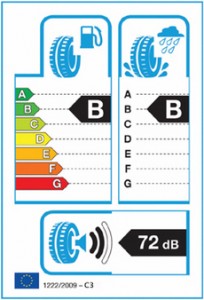
Tyre Condition: Bad tyres are one of the three most cited causes of NCT failure since 2008. Since 2012 all new tyres sold in Europe are required to carry an EU label (see image below). The label provides consumers with important information for selecting the correct tyre. Tyres are checked for tread depth, whether it’s correctly seated on the rim, evidence of cuts or lumps as well as distortion of chaffing around the valve stem. For a full tyre guide click HERE.

LABEL DESIGN

EU TYRE LABEL


Headamps: While the task of replacing bulbs in most modern cars is decidedly more difficult than it needs to be, there’s still no excuse for turning up at the NCT with faulty lights. Headlamp aim is one of the most common reasons for failure., Check to ensure the headlamps are securely mounted, that the glass is not cracked / missing or the lens miscoloured (i.e. not white or yellow) and that they don’t contain water / moisture (fogged up headlamps is evidence of this). Check that the dipped / main beams work simultaneously. And ensure you don’t have HID bulbs fitted in non-HID headlamps. Finally check to ensure the alignment is correct.


Indicator Lamps / Switch: Check they work, are clearly visible, mounted correctly and that the driver can be immediately aware from his seat that each indicator is functioning. Also, worth remembering that an indicator switch that does not automatically switch off is not a cause for failure.


Engine Warnings & Fluid Levels: Obvious one here, but if any warning lights are flashing, well, that’s a warning and a sure fire way to fail the NCT. Always worth checking that engine oil level too. Grab that dipstick! Most of these should be labelled clearly under the bonnet and are relatively cheap to purchase.


Wipers Washers & Blades: Wiper Blades needs be clean effectively an are sufficient enough to give the drive a satisfactory view. The speed is also examined. Check the blades / arms are mounted correctly. Ensure the washer is aimed correctly.


Horn: This one’s obvious. Give it a beep! Making sufficient noise? Good to go then.


Seat Belts: Frayed, cut or repaired seat-belts will fail the test. Damaged buckles, loose of detached fixing bolts or faulty locking mechanisms will also be failed. Equally, any belt that cannot fully extend will not be passed.


Buying a Second Hand Car Checklist

buying a car checklist

Following on from our recent blog and the theme of buying second hand parts, we’ve decided to put together a check-list of important points to consider when buying a used car.

Checking the Car’s Exterior

Is the car on level ground? This is important in order to allow you to properly check the tyres and any sagging issues there may be.

Inspect the paint job: Make sure you give the cars paint job a thorough going-over. Is Rust spots, dents and scratches are obviously undesirable, and in the case of rust spots could later lead to further issues. Roughness and / or unevenness is a potential indicator of previous use of masking tape or a poorly executed paint job to mask over these blemishes.

Boot-iful: What condition is the boot in? Tread carefully where there is evidence of rust or leakage.

Tyre Check: Tyres on a used vehicle should ideally be matched and evenly worn. Uneven wear can sometimes be attributed to knackered steering and suspension parts. Always worth checking the spare tyre too to ensure that it’s a full spare and not a cheap filler that will serve little to no purpose.

You’ve been framed: This one can sometimes be difficult to spot, but it’s definitely one of the most important things on this checklist as the frame is an integral safety feature. Collisions with faulty frames are particularly dangerous. Look out for clamp marks (i.e. holes or gashes) as a sing of previous damage. Uneven paint jobs (i.e. paint on rear / front headlamps) may also give away a vehicles bumpy history (pun intended). Remember, the gaps between body panels should always be of a consistent width. Door’s, boots or hoods that don’t close and seal properly is strong evidence that the vehicle has been involved in a series accident.

Get down and dirty: If possible try and inspect underneath the car (preferably with it safely raised). Check for black spots or rust on the exhaust system as both indicate leaking. Rub your fingers along the exhaust – if you find greasy grime you’ve got a problem. Get the car running too and check for white vapour. If it’s emitted in warm conditions there’s issues.

Under the Hood

Check for damage: Dents? Rust? Beware! Look for the VIN (vehicle identification number) where the hood joins the fender. No sigh of it? That’s a tell-tale sign that the fender has been replaced.

Hoses and Belts: Important to inspect all hoses and belts for cracks. Radiator hoses should be neither soft nor sticky. Hoses with noticeable swelling where connected to the radiator or engine will need immediate replacing. Might as well check for leaks around hose clamps while you are there.

Engine Check: Here you should have your eyes peeled for evidence of leaks, stains and corrosion. Any evidence of these could be indicative of a gasket leak, which could potentially lead to some very expensive repair costs further down the line. All engine belts should look as good as new. Replacing old belts which can easily snap can prove costly.

Filler Cap: Does the oil filler cap have a foamy residue inside it? If so then you could be forced to deal with a faulty / leaking head gasket. And if that is the case then you might be best of holding onto your money. What sort of condition is the overflow jar in? If you find grimy brown coolant than its possible that it’s never been flushed or, again, there is a leaky gasket at play.

Dipstick: Always worth checking the transmission fluid. Pull the dipstick out and inspect the fluid. It should ideally be pink or light red. If dark (and this is sometimes the case with older cars), it should never look or smell burnt. Best to do this check with the engine on!

Timing Belt: The timing belt is the most important belt in a car’s engine, and therefore the most expensive to replace. CHECK IT!

What about inside the car?

Keeping Up(holstery) Appearances: Pretty obvious, and easy to spot – rips, stains, tears, all undesirable scuff marks.

Air Conditioning: OK, so here in Ireland the air-con might not get nearly as much use as we’d all like, but you should still make sure it’s working perfectly.

Mileage: This one really goes without saying. Check the odometer. And if there is any lingering doubt, make sure to have the seller put in writing a confirmation of the correct mileage.

Lights Out: How does the car function when it’s not moving? Parking sensors etc should always be given the once over.

Test Drive

Brakes: This one is really stating the obvious, but the best way to learn about any car is to take it for a test drive. And one of the most important things to check is the brakes. Press down firmly to decelerate hard in order to accurately judge the state of the brakes (30mph is a good speed to try this test). There should be no vibrations from the brake pedal. Also keep an ear out for noises such as squealing. If the brakes are throbbing you may be looking at having to replace the rotors or pads. There should be no swerving. If it is swerving then the brake calipers or steering components could be worn.