Archive for Cleaning

Rejuvenating Your Car (Part 2 – Fluids)

Car DIY - Changing Car Fluids

Last month we looked at ways of rejuvenating your old motor. We discussed ways of superficially sprucing up the car – cleaning tips, interior and exterior styling options, accessorising etc.

This time around however, we’re going to focus on the actual performance of the car and affordable ways of ensuring your vehicle keeps running smoothly.


Flush out your fluids

This is one of the most essential and cost effective ways of protecting your car against break downs and an assortment of mechanical damage. It’s a straight-forward job even for a novice. And the more you do it the easier it becomes.

  1. You can start by consulting your car manual (if you still have it – if you don’t you might want to invest in one HERE). The manual’s, while not essential, at least provide a guide for checking and changing fluids – you can then mark the dates in your calendar to ensure the job gets done wNext hen it needs doing.
  2. Park the car on a flat surface and pull up the handbrake.
  3. Open the car bonnet.
  4. Once the car has cooled down and the oils have drained (give it an hour to be safe) you can check the ENGINE OIL. Pull the Oil Dipstick fully out and wipe clean to ensure a clear reading. Put the dipstick back in and remove once again to read the oil level. The dipstick has a number of marking indicating differing oil levels. If low add an appropriate amount of engine oil.
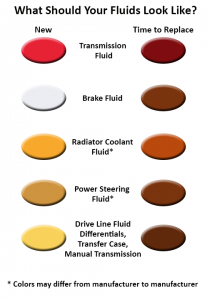
    1. It’s also worth noting the engine oil colour –Clean = clear / golden, whereas Black / Brown indicates dirty engine oil. UIf the oil is cloudy it might point to contamination (possibly with coolant). This could be down to a blown head gasket in which case you should bring the car to a qualified mechanic.
    2. As a general rule of thumb, it is recommended that you change your engine oil every six months.
    3. If you are going to change your oil (or fluids) an OIL VACUUM PUMP is a handy tool.
  5. Next check the TRANSMISSION OIL, which is responsible for greasing the gear system. It’s part of a closed system so you shouldn’t ever be low on it. You just want to check that it’s clean. You will need to have the engine running. It is the second of the two dipsticks. Follow the same steps you did for checking the engine oil.
    1. FYI: Transmission Oil is reddish in colour and does not need to be replaced as much as engine oil. Brown / Black transmission oil should be replaced.
  6. BRAKE FLUID – Again, like the Transmission Oil, the Brake Fluid is a closed system. Locate the brake master cylinder (it’s generally on the driver’s side of the car by the rear of the engine compartment. It has a plastic reservoir and rubber cap with metal tubes emanating from the cylinder.
    1. Low brake fluid is never a good sign – cars aren’t designed to consume a lot of the stuff – so it could point to a brake line leak, or worn brakes. Low fluid might necessitate a car check-up as a car low on brake fluid might not stop!
  7. POWER STEERING FLUID – The power steering fluid is responsible for keeping your steering smooth. When it starts to run low you may begin to hear a slight groaning noise from the wheel.
    1. Locate the reservoir – you can usually check the level by looking at the reservoir. This fluid does not generally tend to run low, so it levels have dropped significantly then it might be worth checking with your mechanic.
    2. The need to flush and replace is rare, but it doesn’t hurt to keep the level topped up.
  8. COOLANT ANTIFREEZE – Responsible for keeping your car running cool. Low levels of coolant result in the car overheating. It’s located in the car’s radiator.
    1. Remove the radiator cap once the car has cooled down.
    2. You should a line inside that indicates where the coolant should come up to.
    3. Be sure to add the same coolant that’s currently in the car.

fluid-colors

Rejuvenating Your Car (Part 1)

Spring Cleaning

Statistics might show that sales of new cars in Ireland are up an impressive 28% on this time last year, but there’s still plenty of people out there that don’t have the disposable income to splash out on a new motor.

And given that the comparatively low sales of new cars during the last number of years has resulted in a shortage of competitively priced second hand cars on the market at present, many of us won’t be getting a motoring upgrade anytime soon.

But here’s the thing – many cars built in the last 10 – 15 years can now go 200,000 to 300,000 miles if they are properly cared for. Your vehicle might feel old and run down, but if she’s still running there’s plenty of cost-effective ways you can utilise to galvanize the old motor.


Clean It

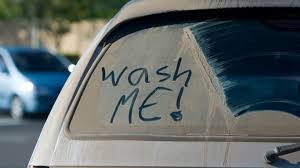
Wash Me

First things first, CLEAN YOUR Car! And, I’m not just talking about a half-hearted hovering of the interior either. Get rid of the accumulated clutter and rubbish, and then get yourself some shampoo / cleaning products for the carpet, upholstery and dashboard. There’s also a wide range of products available for giving your wheels a clean sheen.

Leather Care Cream

All Purpose Cleaner

Dashboard

Disinfectant


Interior Styling

So, you bought the cleaning products and applied some much needed elbow grease. The car is already looking much improved. But cleaning will only go so far. It’s only natural that after years on the road the interior is also feeling the effects of wear and tear. Thankfully, it’s not going to cost an arm and a leg to revitalise that drab interior.

Floor Mats

Steering Wheel Cover

Gear Knob

Seat Covers


Accessories

Just because your car doesn’t have the fancy mod-cons that are commonplace in a lot of mid-range vehicles today doesn’t mean you can’t install them in your aging motor. Start streaming your extensive music collection on Spotify through your phone with a Bluetooth enabled stereo system. Avoid penalty points with a hand-free kit. These additions don’t exactly transform your vehicle into a smart-car, but they do make practical improvements and enhance your driving experience.

Car Stereo System

Hands-free Kit


Exterior

So, you have the interior spruced up. You have some new accessories on-board. Now it’s time to turn your attention to the exterior. Start by giving your headlamps a proper scrub, before moving onto the paint job. You’d be amazed what a difference this can make with some basic products and a little know how. If you have a little cash left over you could look at getting some new mud flaps or wheel trims.

Headlight

Make Your Headlamps Shine Like New

Polish Your Car Like A Pro

Wheel Cleaning Product

Wheel Trims

Mud Flaps

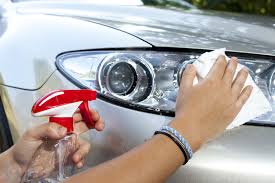
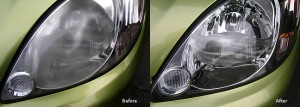
Make Your Headlamp Shine Like New!

Headlight

Here on the Motorparts.ie blog we recently looked at ways of ‘winter-proofing’ your car. We touched upon the importance of replacing fading or burnt out bulbs, as well as regularly removing grime from the lenses.

We’re going to look at this aspect in more detail this time around, because even though we’re beginning to see more of a stretch in the evening, having your headlamps in showroom condition makes a huge difference when driving at night.

It’s a straight forward and affordable process that won’t take up much time, but one which will make driving at night all the more easy (and safe). It’s also a potentially huge money-saver – because you cannot simply replace the plastic on sealed headlamp units. If your car happens to be an expensive vehicle with high-performance lights then replacing this unit can cost hundreds of euros.

However, with a few cheaply bought tools and products, and some all-important know-how, you can get your headlamps looking as good as new in under an hour for considerably less.


Preparation:

Start by washing away whatever grime and dirt may have built up on the surface of your headlamps. For a seriously deep clean consider using a rich gel formula such as Meguiars Plast-RX.

The non-toxic formula effortlessly removes scratches, stains, cloudiness and oxidation.  If you’re working on a tight budget then washing with warm, soapy water should suffice.

There are a number of things to look out for once the surface has been cleaned. Hazing, yellowing and cracks are all tell-tale signs of wear and tear, and all can have detrimental effects on the effectiveness of your headlamp performance depending on how far along they are.

Hazing and yellowing starts once the hardcoat is worn down. The surface subsequently absorbs more light (yellowing) and scratches (hazing). In terms of hazing, a cheap clean might do for reversing the effects.

However, if the headlamps have a noticeable yellowish crust you will almost certainly require a more comprehensive treatment with professional products (such as Plast-RX or Meguiars Head Lamp Restoration Kit). Cracks on the lens will require professional resurfacing.

Tip: NEVER use household glass cleaning products on your headlamps. These products have ammonia in them which causes plastic to turn yellow.


Sanding:

Time to get abrasive. Sandpaper is used to wear away the layer of haze and/or yellowing that has built up on the surface.

Have a few different coarse grades of sandpaper to hand. It’s generally advised to stick to finer (i.e. less coarse) grades for finishing, with one coarser grade to begin the cleaning with.

You will be looking for an even, dull finish when using the coarser sandpaper. Then, switch to the finer sandpaper and continue the process until the dullness gives way to more clarity.

Tip: There’s an obvious danger of scratching the surrounding paint when sanding the headlamps. Stick some tape around the edges of the headlamp.


Polishing:

There’s a few options available to you when it comes to the polishing process. On the one hand you have a variety of different headlamp-specific buffing compounds (including the aforementioned Meguiars).

Use a microfibre mitt (such as the Kent’s Microfibre Cleaning Kit) to apply the buffing compound. Work in a circular motion. It may take up to three buffing coats to get the finish you desire.

If money is an issue there may be a number of household products that will do a temporary job. Bath tub and sink cleaners sometimes are effective given that they are manufactured for plastic – just ensure they’re non-abrasive. Toothpaste is another oft-quoted life-hack when it comes to cleaning headlamps. Avoid products with whitening agents, peroxide and additives. Blue toothpaste is said to be the best fit for this purpose.

Before After